Transformer jacket
size: S-M (L-XL);
Bust circumference: 80-90 (90-100)cm;
Jacket length (option 1)- 48 (54) cm;
Jacket length (option 2)- 63 (69) cm;
Sleeve length on inner edge: 36 (40) cm.
Necessary materials:
For option 1-6 (8) sculuri fir Kutnor Beby Linen(70% baby alpaca; 30% in; 125 m/50 g);
For option 2-9 (11) sculuri fir Kutnor Beby Linen(70% baby alpaca; 30% in; 125 m/50 g);
Andrele no. 5.5.
Knit density: 16 stitches x 32 rows = 10 x 10 cm.
The stripes will be knitted alternating purl and purl rows as follows:
Row 1 (the front side): All front stitches.
Row 2 (back side): All purl stitches.
Row 3 (the front side): All front stitches.
Row 4 (back side): All purl stitches.
Row 5 (the front side): All purl stitches.
Row 6 (back side): All front stitches.
Row 7 (the front side): All purl stitches.
Row 8 (back side): All front stitches.
Repeat rows 1-8.
Knitting explanation:
Detail 1 (top and sleeves): Mounted on Andrea 43 (51) stitches and knit 124 (138) cm with lazy point (all front stitches in the front and back rows). Eyes close.
Detail 2:
Mounted on Andrea 48 (58) stitches and knit with 80 stripes (92) cm. The last row of the detail will be row 2 of the stripe pattern. The eyes close loosely, like purl stitches.
Detail 3:
Mounted on Andrea 36 stitches for the jacket version 1 or 60 stitches for the jacket version 2. Knit with lazy stitch 84 (96) cm, after which the eyes close loosely.
finishing:
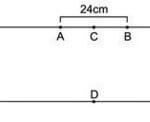
Step 1: Place marker C on the middle of detail 1. Marker D is fixed on the opposite side. Marker A and B are fixed at a distance of 12 cm on either side of marker C.
Step 2: Detail 1 is placed side by side and the sleeve seam is made – 36 each (40) cm from the edges to the center. 52 are left unsewn (58) cm from the center of the detail.
Step 3: Detail 2 is placed side by side and the middle of the detail is located. The middle of detail 2 is fixed to the middle of detail 1 with the help of marker D. The edges of detail 2 are fixed to detail 1 with the help of markers A and B. Detail 2 is sewn on the edge with detail 1.
Step 4: Detail 3 is placed side by side and lies in the middle of the detail. The middle of detail 3 is fixed to the middle of detail 1 with the help of marker C. Then, from both sides, the edges of detail 2 are placed next to the edges of detail 3 and the seam is made.

