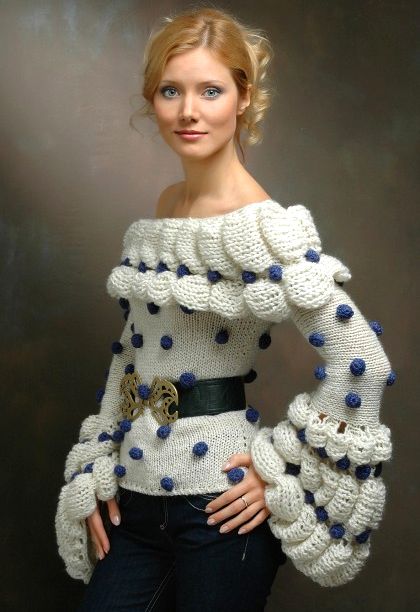
White sweater
 size: 36/38
Necessary materials:
520 g for white and 80 g for blue Music Style Collection COUNTRY (72% work virgina, 10% silk, 13% acrylic, 5% nylon, 105 m/50 g);
Andre no. 5 and no. 6.5;
Crochet hook no. 4.
Knit density: 14 stitches x 20 rows = 10 x 10 cm;
Models used:
Berries: Crochet with blue thread as follows: 2 chain stitches, 9 crochet stitches in the first chain stitch, 1 connecting leg in the first leg with jeteu.
Next, crochet 2 times 4 legs with jeteu, in the first eye at the base. The working thread is passed through all the stitches and tightens.
The basic model:
Row 1, 2 and 4: jersey point.
Row 3: The first 9 stitches are knit in the following way: ((1 front eye, add 1 stitch between 2 stitches) x 8, 1 knit stitch = 17 stitches). With the 17 stitches obtained is knit 8 rows jersey point, then unsplete the added stitches. The 9 stitches left on the needle are knit with jersey point 2 rows.
Repeat rows 1-4.
Knitting explanation:
Spate: On knitting needles no.5 is cast 55 stitches. Next will knit with knitting needles no.6.5 with jersey point, subtracting from both sides in every 2nd row 5×1 stitch = 45 stitches.
After 15 сm from the first row is added from both sides in every 6th row 5×1 stitch = 55 stitches.
After 35 cm from the first row, for cutting the sleeves, close from both sides by 5 stitches = 45 stitches.
After 50 cm from the first row close the remaining stitches.
Face: knits as the back side, but after 45 cm from the first row, all eyes close.
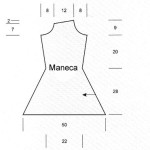
Sleeve: On knitting needles no.6.5 with white thread, mount 29 stitches and knit the basic model with abridged rows in the following way: It starts with the first 12 stitches (knit embossed pattern on 9 stitches), then they are included in the work, from the right, in every 4th row 1×9 stitches (knit embossed pattern on 7 stitches), 1 x 8 stitches(knits the embossed pattern on 5 stitches) = 29 stitches.
Then, mount on the needle from the right 34 stitches that will knit with jersey point and abbreviated rows. It starts with knitting the first 4 stitches from the right, then it is included in the work every 2nd rad 1 x 3 stitches and 1 x 27 stitches.
For the neckline of the sleeve on the right ,add every 2nd row 1 x 1 stitch and 1 x 2 stitches, after which it will decrease in every 6th row 4x 1ochi , every 2nd row 1×2 stitches and 1 x 1 stitch.
Neckline sleeve on the left will knit symmetrically.
After 50 cm knitted (is measured on the bottom edge with the embossed pattern), all eyes close.
finishing: The seams of the sweater details are made.
For the collar , on knitting needles no.6.5 with white thread, mount on needle 27 stitches and knit in the following way:1 edge stitch, on the first 14 stitches are knit basic pattern, 2 front stitches , on the following 9 stitches are knit basic pattern, 1 edge stitch.
When the length of the collar will measure 100 cm, all eyes close.
Sew the collar on the edge of the neckline.
With blue thread crochet bobulete and fix on the sweater (see the picture).


There is the possibility to purchase such a sweater? Thank you!
It's great but I don't think I'll be able to make such a gem! Can not buy?
Knit if the order. But I usually make clothes for children, socks, hats.
Sweaters knit just for me. There's a problem with the measures.. It's one thing to see the person in front of you and take all the measures and another is to receive them by e-mail and knit on the blind.
An impediment would be the free time, which unfortunately I do not have.
please give me more detailed scheme ,Thank you and astet an answer
Moreover I can not help you.
In the article clearly write how to knit every detail.
Read carefully and realize.
Hi Mrs. Nina please excuse me that you all bother me I started the white sweater I did face and back but do not understand how to start mineca writes to start with the first 12 stitches and to tri.model embossed from 9ochiuriadica as I mean I do not understand you are nice to help me a little
In fact, the sleeve is the most complicated detail of this sweater.. Let's take it to pieces with the description of the sleeve. At the beginning of the article there is a paragraph with the basic model, read it and that one that will help.
Mounted on needle 29 stitches. Start the embossed model with the first 12 stitches in the following way: 1 edge stitch, 1 eye girl, (1 eye girl, 1 eye added)x9, 1 eye girl, the working thread you pass after the eye that follows, return the work and knit to where you started. Knit this portion 4 rows with jersey point – this will be the steering wheel at the base of the sleeve, largest.
Include in knitting the following 9 stitches, including the eye on which you passed the thread. Knitting the stitches of the first volanas, then on the next 9 stitches in the following way:1 eye girl, (1 eye girl, 1 eye added)x7, 1 eye girl, the working thread you pass after the eye that follows, return the work and knit to where you started. Knit this portion with another 4 rows with jersey point – you will knit the flywheel 1 and 2.
Include in knitting the following 8 stitches, including the eye on which you passed the thread. Knitting the stitches of the first volanas, valanasului stitches 2, then on the next 8 stitches as follows:1 eye girl, (1 eye girl, 1 eye added)x5, 1 eye girl, 1 edge stitch. Return the work and knit to where you started. Knit this portion with another 4 rows with jersey point – you will knit the flywheel 1,2 and 3.
In the end the 1st loophole will be knitted with 12 rows, volanasul 2 with 8 rows, 3 4-row steering wheel. All the added stitches are unpleted and on the working needle remain again 29 stitches that you knit with 2 rows jersey point, then start the procedure again.
After you have disheveled the added stitches, mount on the right needle another 34 stitches and knitted sleeve after description. The sleeve of a knitted at the same time as knitting the valves.
It's pretty painstaking, but with a little patience and a little concentration you will succeed.
May you have an increase!
Thank you very much ptr.explicatie ,I hope I can handle it . Thank you
.
good evening. I'm a beginner and I want to work this wonderful model myself. but there are certain things I don't understand – although I have read your explanations regarding the creation of the sleeve. My perplexity is at the ruffles
the eye after which I passed the thread and add to the next volanas is working – or just take it on the needle?
after the procedure of the flywheels I have to add from the right another 34 stitches – correct?
while I work the 34 stitches – continue the procedure of the flywheels simultaneously?
explain to me please how to multiply all the second row 1 * 3 and 1 * 27?
thank you for the reply
Hello!
To answer your questions:
1. Pass the thread after the eyes and turn back. In the next row, the eye after which the thread was passed will not knit. He will knit only when you start knitting the next volanas.
2.Mount 34 stitches. These stitches knitted by description simultaneously with knitting ruffles, rather it will coincide with knitting volanasului 3.
The procedure is called knitting with shortened rows.
Do not add any eyes to the sleeve. When you have mounted the 34 stitches, first time knitted them on the first 4, the thread you pass after the next eye and return. Knitted 4 purl stitches and make ruffles.
In the next row, knitting flywheels, 4 front stitches, the next 3 knit stitches, pass the thread after the next eye and return.
Knitted 7 purl stitches, the stitches of the flywheels. Next, the girl, the stitches of the flywheels, 7 stitches face, 27 stitches. Will return with knitting stitches back.
Knitting flywheel 1 and 2. When you get to the volanasul 3 it knitted concomintent with the 34 stitches of the sleeve, knit them all at the same time without turning the work and start adding stitches.
Hello and I will bother you are not cleared how to put the 34 ochuri on the right andreaua and they are working only at the end of the 3rd volanas,and mineca is knit round not ,and rascroiala mineci the cite rinduri is made or measured .thanks
Simply mount them, how to start any work. See in the comment above. I explained once more how to knit the sleeve. Print and description will also help.
Hello Mrs. Nina I apologize that will all bother but for 2 weeks I struggle to mineca and fail,I made the flywheels although they are not like in the picture or somehow are arranged on mineca ,then I read the comments above but I still do not get out . Let me explain where I'm inpotmolesc ,I made the flywheels ,I added the 34 stitches but mineca goes round ,not the length ie up and do not know where to drop under the arm ,I saw the sketch but still do not understand . Please help me that I have not worked so once or I do not understand something .thanks ptr. help
That's right, the sleeve is knit on the width. Because of this, the abridged lines are also used.
Mount 34 stitches, knitted them on the first 4, then include 3 more, then 27.
After adding at the end of row 1 eye, then 2 stitches (it's the little portion under the arm) and start adding every 6th row as 4×1 eye ( you rise up towards the shoulder), close 1×2 stitches and 1×1 eye is the shoulder line and start knitting the other half of the sleeve symmetrically. Close 1×1 eye, 1×2 stitches- you finished the shoulder line, descend down on the arm dropping 4×1 eye every 6th row, mount 2 stitches on the needle, then 1 eye (the portion under the arm.
When you climb up to the shoulder add stitches, when you go down you drop.
Then from the underarm knitted the first 27 stitches, include the following 3, then the next 4.
It's quite complicated that knitting with the flywheels.
The flywheel may have knitted tighter and came out more fixed.
You can knit the flywheels separately, then sleeve and sew the ruffles on the edges to ease a little work.
Thank you ptr. Explanation,I'll try again. A good day.